Introduction
This guide walks through the full lifecycle of a first contract on XELIS:
- Validate your Playground environment .
- Write and test a contract.
- Export and deploy it on-chain using wallet RPC.
- Invoke entries and verify state.
Setup options
You have two valid ways to follow this tutorial:
- Recommended for most users: use hosted Playground at playground.xelis.io .
- Optional advanced workflow: run Playground locally for a full offline environment.
Running Playground locally is optional. The Offline development guide exists for users who specifically want a fully local setup.
Regardless of which Playground option you choose, you still need daemon and wallet access for deployment and real chain interaction.
Prerequisites
Before continuing, make sure:
- XELIS binaries are installed (
xelis_daemon,xelis_wallet). - You run daemon and wallet on
devnetusing the argument--network=devnet. - Wallet RPC is enabled (Playground uses it to build/broadcast transactions).
If needed, use these guides:
In case the Wallet RPC is not running, simply execute the following command in the wallet console:
start_rpc_server 127.0.0.1:8081 [username] [password]Understand the tools used in this tutorial
- Daemon: your blockchain node. It validates blocks/transactions and exposes daemon RPC methods such as
get_contract_data. - Wallet: your transaction signer and wallet RPC server. It builds and signs deploy/invoke transactions.
- Playground: editor + compiler + RPC client. You write Silex code, compile to module bytecode, and submit transactions through wallet RPC.
Walkthrough steps
Prepare daemon and wallet
Before using Playground RPC to deploy or invoke contracts, make sure your local chain services are running and aligned on the same network (devnet).
Start daemon:
xelis_daemon --network=devnetStart wallet:
xelis_wallet --network=devnet --wallet-path wallet_devnetIt is recommended to start the wallet RPC as it is not enabled by default and will be used by Playground to interact with the wallet.
NOTE: This part is only required for the current guide, it is not mandatory for the Playground itself. You can use Playground to write and compile contracts without running a local daemon/wallet, but you won’t be able to deploy or interact with contracts on-chain directly.
Inside the wallet console, you must run the following command to start the RPC server:
start_rpc_server 127.0.0.1:8081 [username] [password]Result: Playground can connect to wallet RPC and you can sign/broadcast transactions.
Why this step matters:
- Daemon provides blockchain access and daemon RPC methods.
- Wallet signs transactions and exposes wallet RPC used by Playground.
- Matching
devneton both sides avoids connection/network mismatch issues.
Before deploying/invoking contracts, decide how blocks will be produced on your environment:
- Automatic mode: run
xelis_minercontinuously so blocks are mined automatically. See CPU Miner. - Manual mode: keep miner off and call
mine_block [address]in daemon console exactly when you need transaction confirmation.
Both approaches are valid. Manual mode is often more convenient during development because you control when blocks are produced.
Validate Playground runtime
- Open Playground (hosted or local).
- In Projects -> Examples, choose a simple sample such as
Struct. - Click COMPILE.
- Click RUN and confirm output appears.
Then choose an example requiring arguments (for example Factorial), set argument 10, and run again. This confirms compile + runtime + argument handling are all working.
Playground can reuse previous argument values between runs, which is useful during iteration.
Build your contract
If you want to explore the language syntax before writing your own contract, refer to the Silex language reference and the Standard Library which lists all built-in types, methods, and their gas costs.
Replace the editor content with the contract below:
hook constructor() -> u64 {
    let storage: Storage = Storage::new();
    storage.store("name", "number_one_songs");
    let version: u8 = 1;
    storage.store("version", version);
    storage.store("owner", Transaction::current().source());

    let artists: map<string, u8> = {};
    storage.store("artists", artists);

    return 0
}

entry add_artist(name: string, num_one_songs: u8) {
    let storage: Storage = Storage::new();
    require(Transaction::current().source() == storage.load("owner").unwrap(), "OnlyOwnerCanAddArtist");

    let artists: map<string, u8> = storage.load("artists").expect("ErrorLoading artists");
    artists.insert(name, num_one_songs);
    storage.store("artists", artists);
    return 0
}

entry remove_artist(name: string) {
    let storage: Storage = Storage::new();
    require(Transaction::current().source() == storage.load("owner").unwrap(), "OnlyOwnerCanRemoveArtist");
    let artists: map<string, u8> = storage.load("artists").expect("ErrorLoading artists");
    artists.shift_remove(name);
    storage.store("artists", artists);
    return 0
}
What each part does:
constructor: initialize the owner address and an empty artists map.add_artist: inserts or updates an artist and their number-one song count.remove_artist: deletes an artist entry.require(...): enforces access control so only the owner can mutate storage.
Entries without an explicit return type return the default u64 exit code: 0 for success, or any value greater than 0 for a contract-defined error code. If an entry declares a return type, the returned value is stored as an exit_value in the contract logs and can contain up to 256 bytes of encoded data. Errors raised during execution, including failed require(...) checks, are stored in the logs too.
The constructor hook is executed automatically by the network at deployment time. Once the contract is deployed, it can never be invoked again, not by users, not by other entry functions, and not by the contract itself. All one-time setup logic (initial storage values, ownership, configuration) must go here, and return 0 indicates the constructor completed successfully.
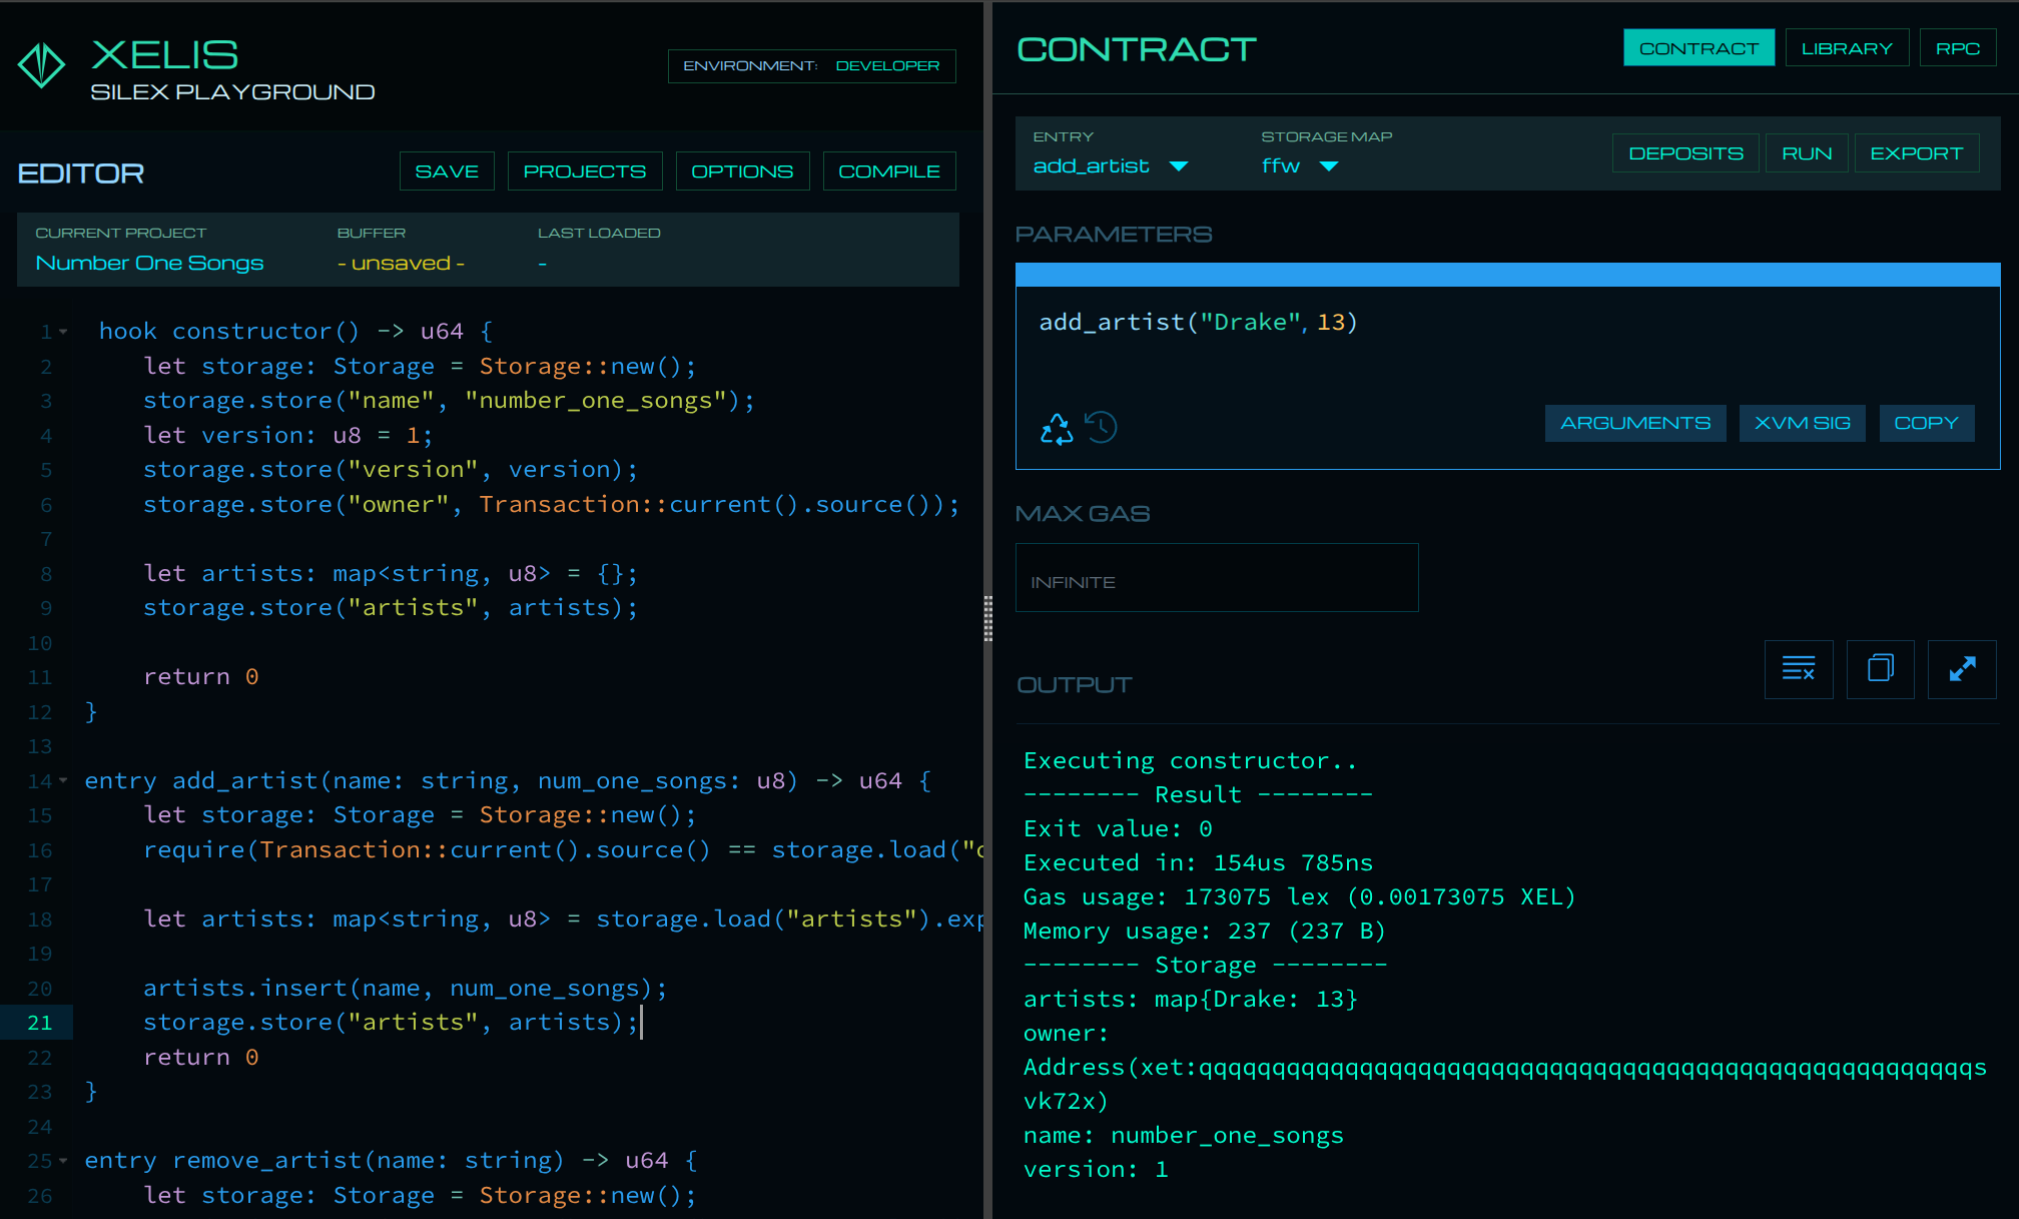
Compile and test locally:
- Click SAVE.
- Click COMPILE.
- Run
add_artistwith sample values. - Run
remove_artistwith a sample name.
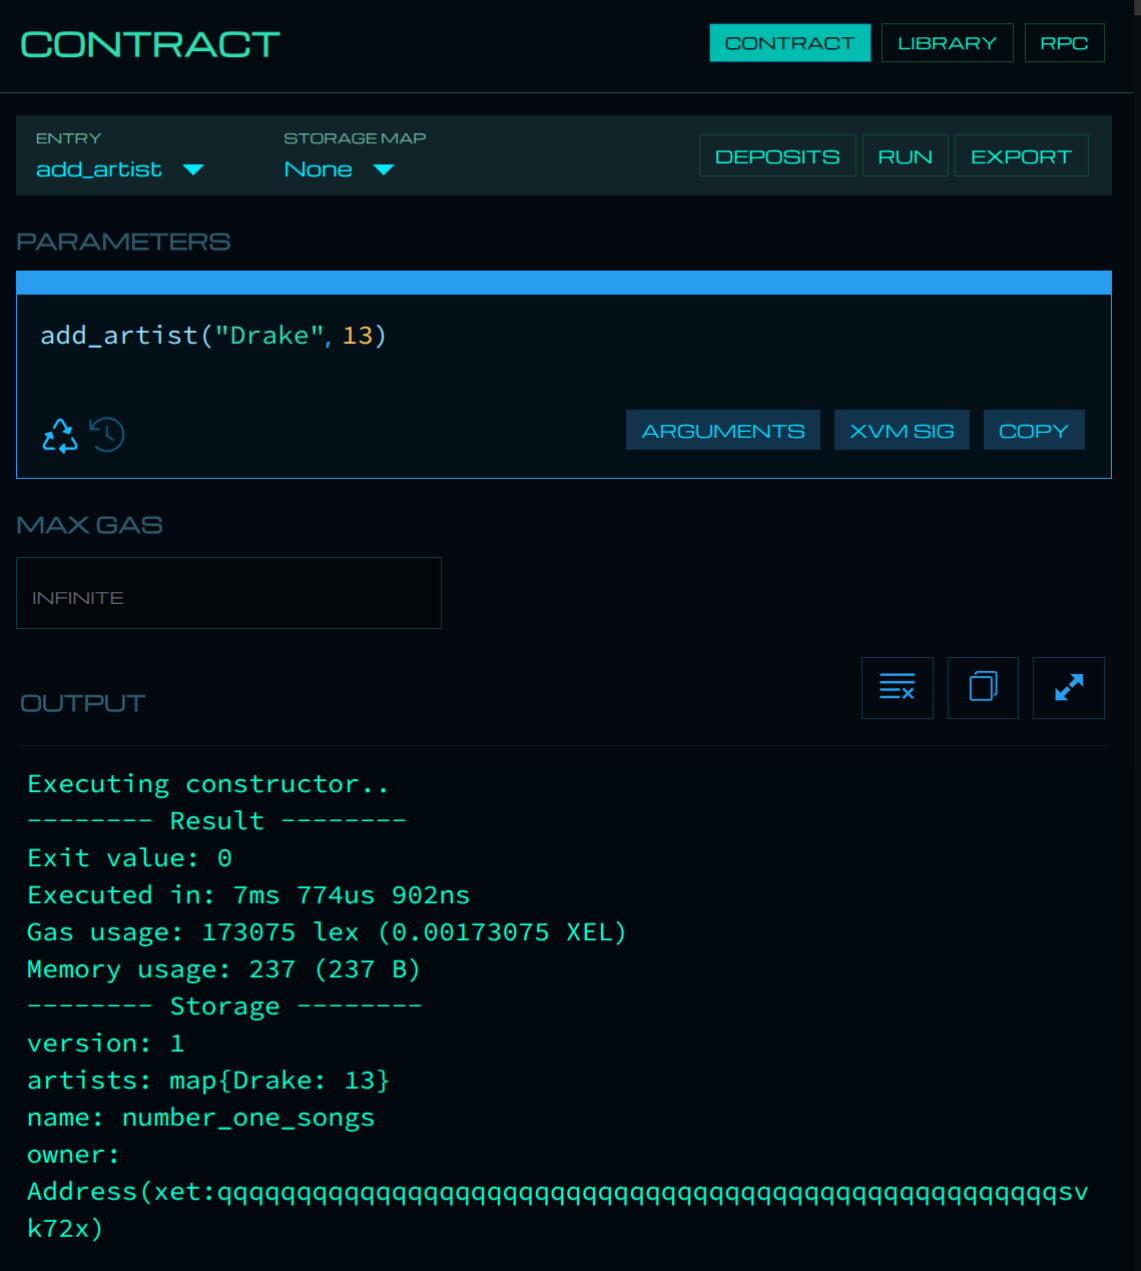
Playground runtime calls are local test executions. They are excellent for validating logic and argument types before you spend fees deploying/invoking on-chain.
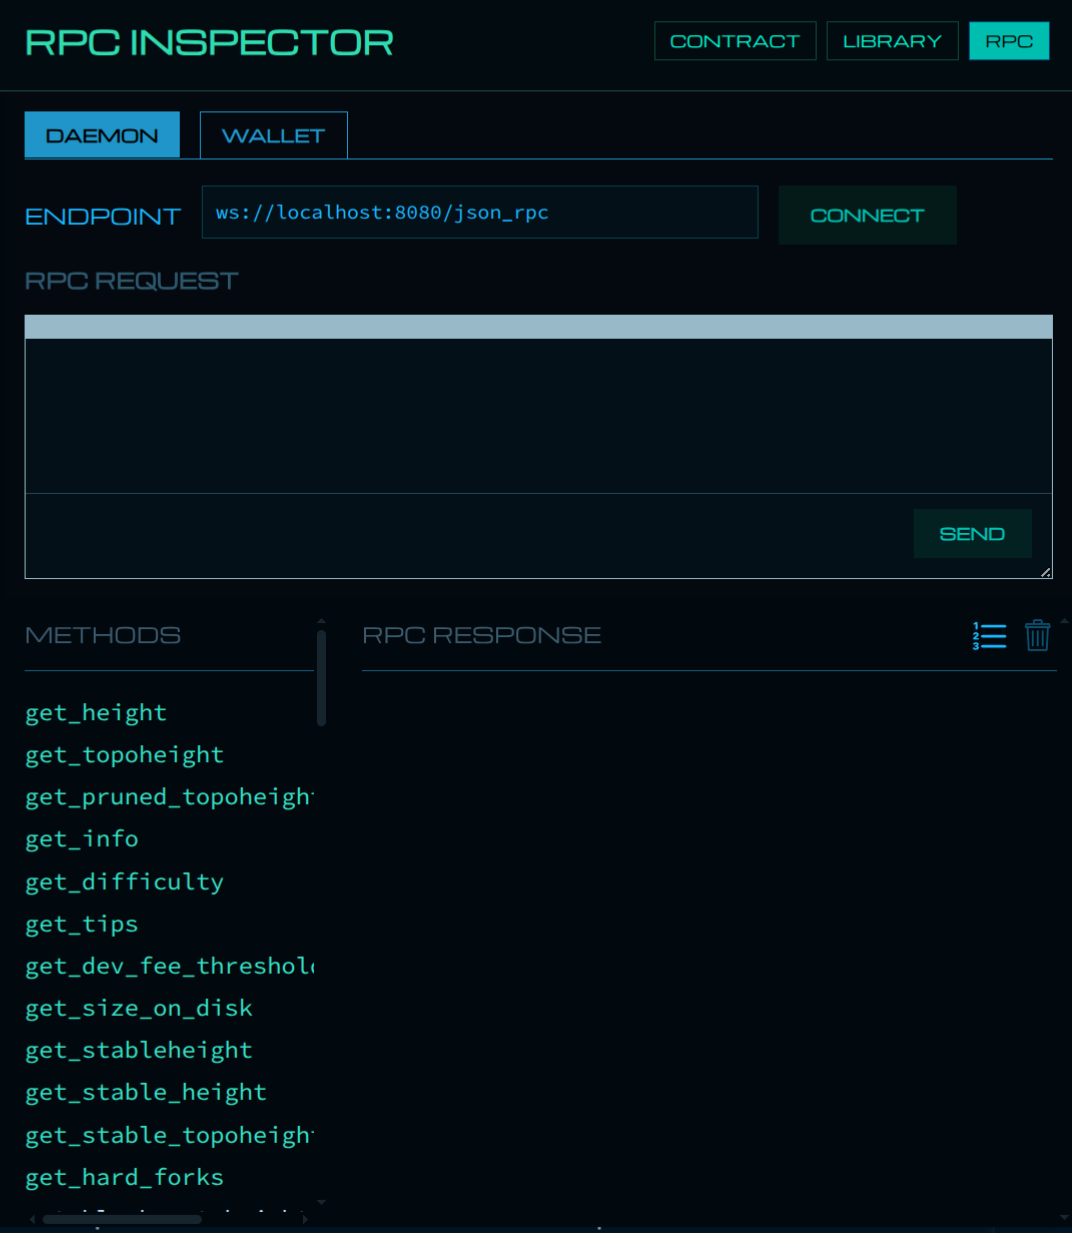
Use RPC Inspector
Connect RPC in Playground:
- DAEMON tab: query chain and contract state.
- WALLET tab: create/sign/broadcast transactions.
RPC Inspector:
- Click the RPC button in the top-right of Playground to open the RPC Inspector.
- Use the DAEMON tab to call node methods (for example
get_info,get_contract_data). - Use the WALLET tab to build/sign/broadcast transactions (for example
build_transaction).
Example daemon query (get_info):
{
    "jsonrpc": "2.0",
    "id": 1,
    "method": "get_info"
}
Example daemon query (get_contract_data):
{
    "id": 1,
    "jsonrpc": "2.0",
    "method": "get_contract_data",
    "params": {
        "contract": "[YOUR_CONTRACT_HASH]",
        "key": { "type": "primitive", "value": { "type": "string", "value": "artists" } }
    }
}
Default wallet RPC URL format:
ws://{username}:{password}@localhost:8081/json_rpc- If connection fails, verify wallet RPC credentials and endpoint used when running
start_rpc_serverin wallet. - Playground remembers your settings for future sessions.
Deploy to chain
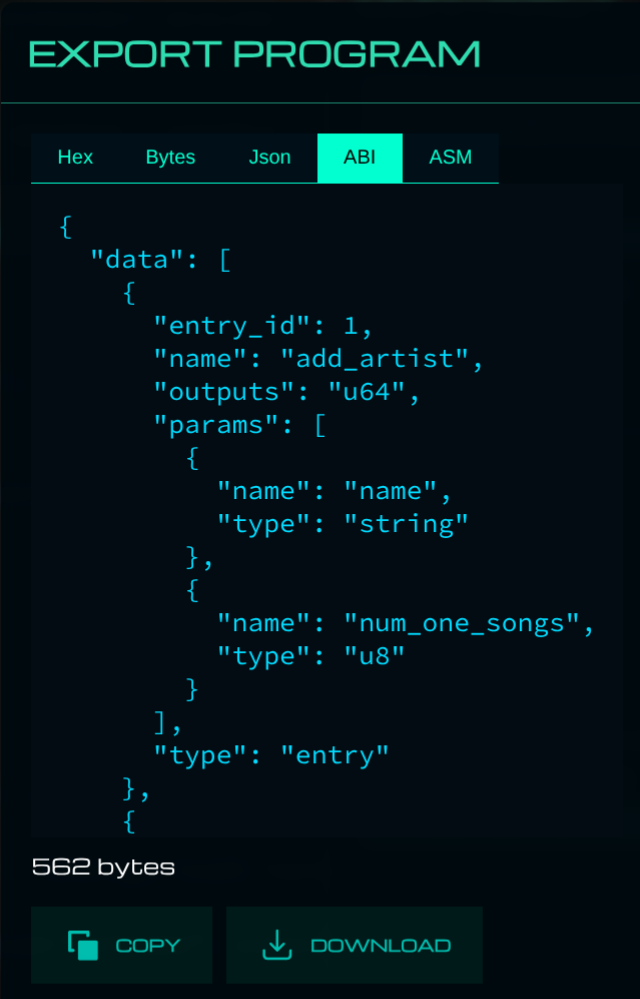
Export deployment artifacts:
- HEX: serialized module bytecode to deploy on-chain.
- ABI: metadata describing callable entries and argument types (
entry_id, parameter schema).
You need HEX for deployment and ABI for reliable invoke payloads.

Deploy using wallet RPC build_transaction with deploy_contract:
{
    "jsonrpc": "2.0",
    "method": "build_transaction",
    "id": 1,
    "params": {
        "deploy_contract": {
            "module": "[HEX_DATA_FROM_EXPORT]",
            "invoke": {
                "max_gas": 500000,
                "deposits": {}
            }
        },
        "broadcast": true
    }
}
0.05 XEL was chosen as a maximum gas fee, which is significantly more than what is needed. The leftover gas will be refunded automatically.
After sending, save the returned transaction/contract hash. You will need it to invoke entries and query contract state.
- As you build dapps and interact with contracts, you’ll need the contract hash frequently. Store it in a text file for easy access.
- you will have to wait until the transaction is confirmed (you can mine a block immediately with
mine_block [address]in daemon console).
Interact and verify
Now that the contract is deployed to the blockchain, we can interact with it. The way we do that is to call (or invoke) the entry function of the contract.
After an invocation is executed, use daemon RPC get_contract_logs with the transaction hash to inspect the entry exit code, typed exit value, or execution error.
To add an artist, call add_artist via invoke_contract:
{
    "jsonrpc": "2.0",
    "method": "build_transaction",
    "id": 1,
    "params": {
        "invoke_contract": {
            "contract": "[YOUR_CONTRACT_HASH]",
            "max_gas": 500000,
            "entry_id": 1,
            "parameters": [
                { "type": "primitive", "value": { "type": "string", "value": "Drake" } },
                { "type": "primitive", "value": { "type": "u8", "value": 13 } }
            ],
            "permission": "all",
            "deposits": {}
        },
        "broadcast": true
    }
}
Add a few more artists using the same method — you can add them all first (you’ll see the transaction count increment in the mempool) then wait (mine a block) to confirm them together.
Read contract state
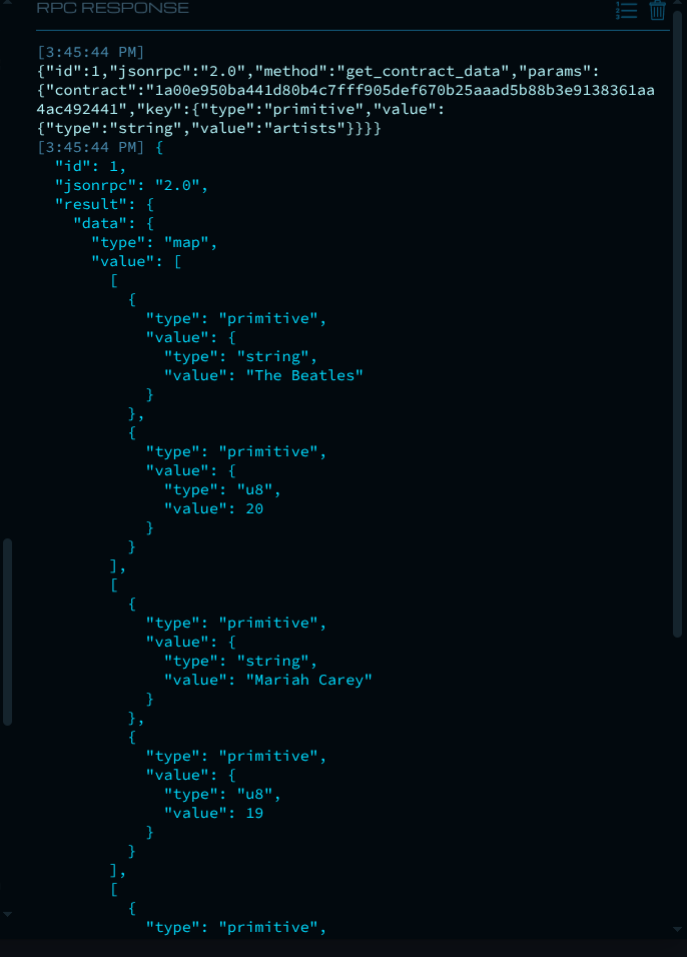
Now that you have deployed the contract and invoked some entries, you can read the updated state using get_contract_data daemon RPC.
We switch to the DAEMON tab in RPC Inspector to call get_contract_data with the same key we used in the contract (artists).
To read state using daemon RPC get_contract_data with key artists:
{
    "id": 1,
    "jsonrpc": "2.0",
    "method": "get_contract_data",
    "params": {
        "contract": "[YOUR_CONTRACT_HASH]",
        "key": { "type": "primitive", "value": { "type": "string", "value": "artists" } }
    }
}
You should see a response containing the artists map with the entries you added, confirming that your contract is working as expected on-chain.
Next steps
As an exercise to deepen your understanding, try extending the contract and testing the new functionality:
- Invoke
remove_artistwithentry_id: 2. - Add richer validations and custom error paths.
- Build a minimal dApp that calls wallet and daemon RPC directly.
Further reading:
- Silex language reference — syntax, types, control flow, and language constructs.
- Standard Library — all built-in functions with signatures, descriptions, and gas costs.
- Memory Storage — how contract (memory) storage works.
- Contract Events — how to emit and listen to events.
- Scheduled Executions — execute contract actions at a future block topoheight.
For questions or feedback, join XELIS Discord .