Create your first Smart Contract
A comprehensive tutorial on creating, testing, and deploying a Silex smart contract on the Xelis blockchain using Xelis Playground.
TLDR
- Go to playground.xelis.io .
- Use the edit window to create your contract.
- Click the Compile button.
- Copy the hex data from the Export window.
- Type
deploy_contractinxelis_wallet(or use Playground’s RPC client - easier) and paste in the hex data. - Done.
Prefer a more detailed walkthrough? Read on…
Setup & Installation
The playground web application at playground.xelis.io can be used without any installation required. However, if the intent is to do more than simple contract experimentation, it is highly recommended to download the Xelis daemon, wallet, miner, and playground on a local development workstation.
Getting the Tools
Before creating a contract, the following should be installed on your workstation.
Xelis Project Tools:
- xelis_daemon — Blockchain node
- xelis_wallet — CLI wallet
- xelis_miner — Block miner
You can install the daemon, wallet, and miner from source or precompiled binaries.
Xelis Playground:
- xelis_playground — Contract IDE
It bears repeating that this tutorial works just fine using the live playground.xelis.io . However, for complete offline development, you can get the source code from github.com/xelis-project/xelis-playground and build it locally.
Using The Xelis CLI Tools
Assuming everything above is installed, let’s start using the Xelis CLI tools.
1. xelis_daemon
Running the daemon — from the xelis-blockchain folder:
target/release/xelis_daemon --network=devnet --allow-boost-sync --log-level=info📋 Flag Reference
--network=devnet— Available networks:devnet,testnet,mainnet.--allow-boost-sync— Faster sync with the network. (Not critical for devnet.)--log-level=info— Sets the log verbosity. (Not critical for devnet.)
The last two options are not strictly necessary to run the daemon, but they are highly recommended when using the other networks, so they are included here so you get used to seeing them.
2. xelis_wallet
To start the cli wallet, from the xelis-blockchain folder:
target/release/xelis_wallet --network devnet --wallet-path wallet_devnetA folder called wallet_devnet will be created and you will be prompted to create a password, which will be required whenever you want to open the wallet. You can choose another name for your wallet folder by changing the --wallet-path parameter.
REMEMBER THIS PASSWORD.
You will need it to open the wallet and to use the RPC server.
Useful wallet commands: seed to see your seed phrase, display_address to see your address, help to see all commands.
🔑 Tutorial Detour — The Seed Phrase
While it is not important to store your seed phrase for devnet, it is SUPER IMPORTANT that you do so for mainnet.
MAKE SURE TO SAVE YOUR SEED PHRASE SOMEWHERE SAFE AND SECURE FOR MAINNET. Should you fail to do so, you will lose access to your coins and smart contracts. You will not be able to recover them.
The RPC server allows you to interact with the wallet from other programs — in your case, Playground. You will use it to deploy and interact with your smart contract. In the wallet CLI, type:
start_rpc_server 127.0.0.1:8081 [USERNAME] [PASSWORD]Where [USERNAME] and [PASSWORD] are the credentials you want to use to interact with the wallet. The server runs locally on port 8081, which is the default.
[!TIP] Over time, entering commonly used switches and commands to the daemon, wallet and miner will become tedious. The solution is to use a
config filefor each of them. See the documentation of each application for more information.
3. xelis_miner
Starting the miner — from the xelis-blockchain folder:
target/release/xelis_miner -m [ADDRESS]Where [ADDRESS] is the address of the wallet you want to send the mined coins to. You can get it by typing display_address in the wallet CLI. Devnet and testnet addresses start with xet:, while mainnet addresses use xel:. A typical devnet command looks like:
target/release/xelis_miner -m xet:xz2allu766nu3g0pa92p05xv2p5ux0xlcwdylwddkr6ukxuld3hqq5u55umDon’t use that address — it’s just an example. Use your own.
You started the miner for a specific reason: you need coins to get anything done. The miner creates the test coins you will use to deploy and interact with your smart contract. Go to the terminal where the wallet is running and confirm that XET is being mined.
Only run the miner when you need coins or need to execute transactions. Turn it off once you have enough, since on some systems it will consume resources that can be utilized elsewhere.
Using Playground
Despite the limited explanation of the Xelis CLI tools, you can now move on to using Playground. Tools like Playground and dapps communicate with the daemon and wallet using mechanisms like RPC and WebSockets. Another mechanism called XSWD can also be used, but it is not pertinent to this tutorial.
Running the Example Contracts
Xelis Playground comes with an Example Project that shows some simple Silex contracts/programs.
- In the EDITOR window, click the Projects tab, then click the Examples row.
- Choose an example like
StructorSpecific Condition. These require no arguments. - Compile the example by clicking the COMPILE button in the top-right corner of the EDITOR window.
- Run the example. Output will appear in the Output section of the Contract Panel.
- Now choose an example with an argument, such as
Factorial. - Click COMPILE. Notice the main function already has an argument of
0. - Click RUN to see the result in the output section.
- Click ARGUMENTS button to open the arguments panel, type
10in the input field, and click DONE. - Click RUN again to observe the output (
3628800).
The system remembers your previous arguments. If you click COMPILE again, the argument will still be 10, and not the default 0. To disable this (why would you?), click the Disable call reuse icon in the bottom-left of the arguments panel.
Writing a Contract
Let’s create a simple contract that keeps track of the number of number-one songs artists have. We’ll store the data in a storage slot with the key artists, where the value is a map of artist name → song count.
The contract will have the following “functions”:
- constructor — Initializes the contract with the owner’s address and an empty artists map.
- add_artist — Adds an artist to the map.
- remove_artist — Removes an artist from the map.
Delete the contents of the EDITOR panel and paste in the following code:
// called when the contract is deployed
hook constructor() -> u64 {
    let storage: Storage = Storage::new();
    storage.store("name", "number_one_songs");
    let version: u8 = 1;
    storage.store("version", version);
    storage.store("owner", Transaction::current().source());

    let artists: map<string, u8> = {};
    storage.store("artists", artists);

    return 0
}

entry add_artist(name: string, num_one_songs: u8) -> u64 {
    let storage: Storage = Storage::new();
    require(Transaction::current().source() == storage.load("owner").unwrap(), "OnlyOwnerCanAddArtist");

    let artists: map<string, u8> = storage.load("artists").expect("ErrorLoading artists");
    artists.insert(name, num_one_songs);
    storage.store("artists", artists);
    return 0
}

entry remove_artist(name: string) -> u64 {
    let storage: Storage = Storage::new();
    require(Transaction::current().source() == storage.load("owner").unwrap(), "OnlyOwnerCanRemoveArtist");
    let artists: map<string, u8> = storage.load("artists").expect("ErrorLoading artists");
    artists.shift_remove(name);
    storage.store("artists", artists);
    return 0
}
🔑 Key Takeaways
- The constructor hook is called once - and ONLY once - when the contract is deployed. We initialize the owner address and an empty artists map here.
- Entry functions are callable by users interacting with the contract. Standard functions are not directly accessible outside of the XVM.
- The
requirefunction enforces conditions. If the condition is false, execution of the contract/program stops and the error message is returned. Here we want to ensure that only the contract owner can add or remove artists.
Click SAVE in the top-right corner of the editor, then COMPILE. The first entry function (add_artist) will be automatically loaded into the parameter panel.
Test add_artist by clicking ARGUMENTS, entering an artist name and a song count, clicking DONE, then RUN.
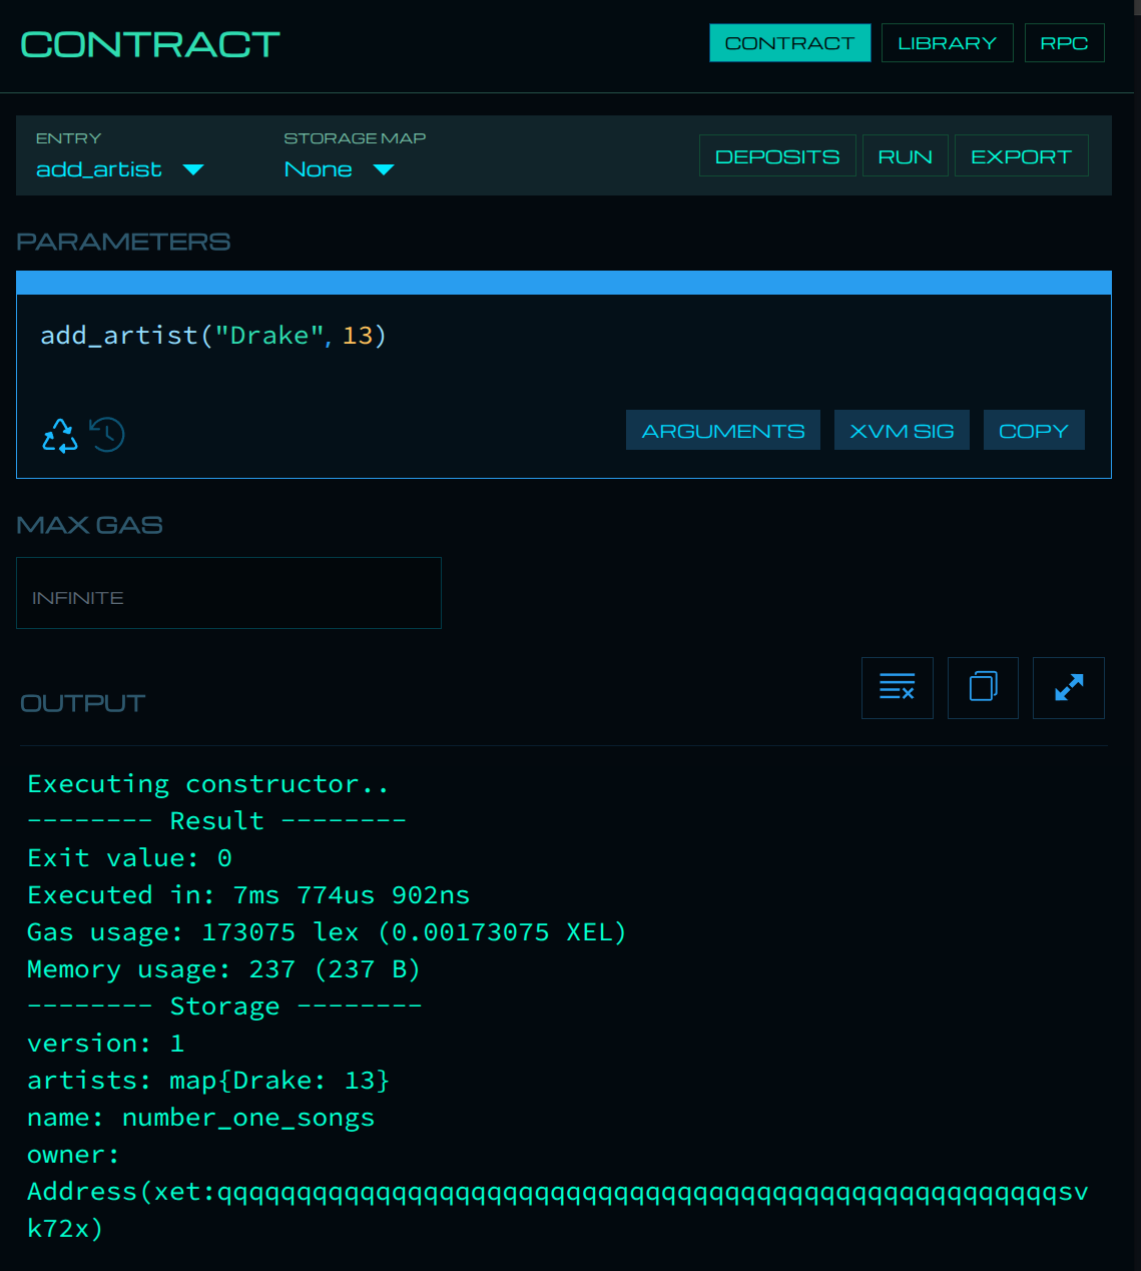
Test remove_artist by clicking ARGUMENTS, entering an artist name, clicking DONE, then RUN. There were no artists stored, so the function will run and exit cleanly.
Every call to RUN resets Playground to a default state, so the stored value from add_artist performed before the remove_artist call is no longer present.
There will be times where you will need to test entries in the contract with some default state. You could initialize the constructor with some test storage values, but this is somewhat clumsy. It can also be done with the STORAGE MAP Editor, where you can create storage presets.
Currently, primitive types like, numbers, strings, and booleans are supported. Unfortunately, complex types like maps are not yet supported in the Storage Editor — this will be added in a future update.
Exporting the Contract
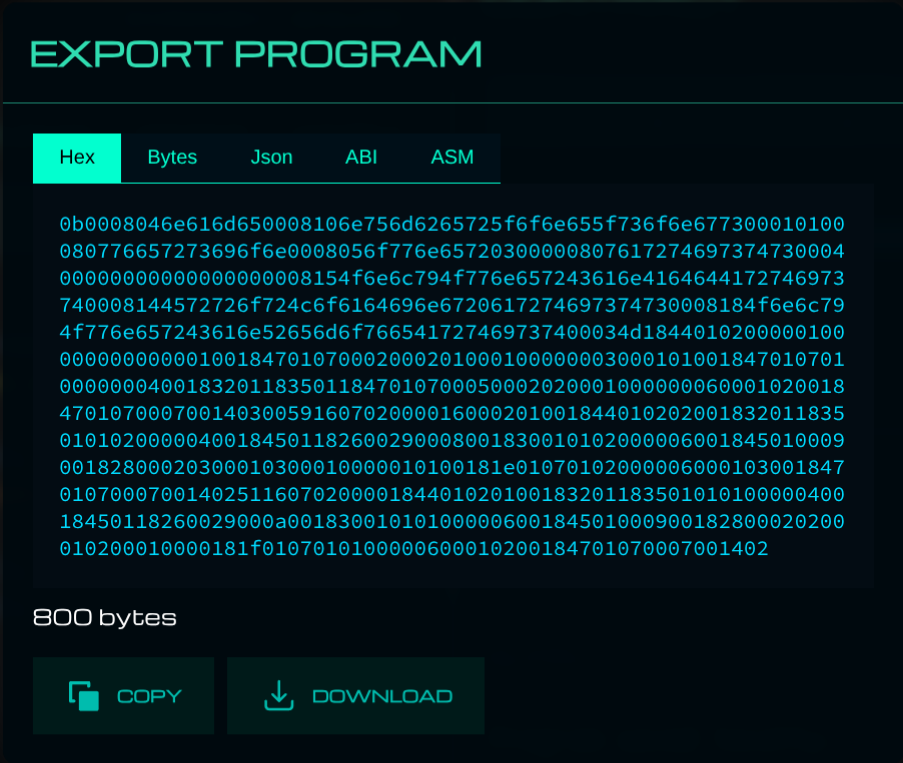
Click the EXPORT button in the top-right of the contract panel. This opens the Export panel with two important tabs:
- HEX — The compiled contract in hexadecimal format. This is what you submit to the blockchain.
- ABI — A JSON description of the contract’s entry functions and arguments. Notice the
entry_idvalue — you will be using it later.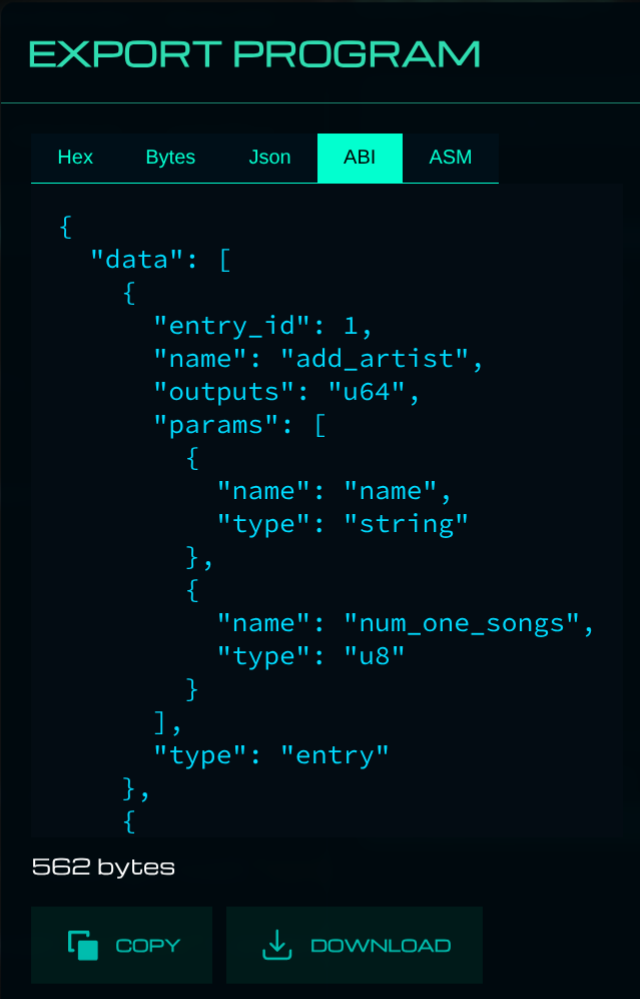
The compiled contract (or more precisely, program) is what XVM runs. This is what we need to deploy. There are two ways to deploy it: directly via the wallet CLI, or via an application that can make rpc calls to a Xelis wallet, such as the RPC Inspector in Playground.
Deploying the Contract
To deploy the contract, there are two options: using deploy_contract in the xelis_wallet directly, or using the wallet RPC client in Playground. Pasting formatted json into a terminal is not ideal - you are free to experiment with doing it, however, we will focus on using the RPC Inspector in Playground to perform the task.
The RPC Inspector
Click the RPC button in the top-right corner of Playground. Inside the RPC Inspector, you’ll find two tabs:
- DAEMON — Interact with the blockchain node. When connected, you’ll see the list of available RPC methods in the left panel.
- WALLET — Interact with your wallet to submit transactions.
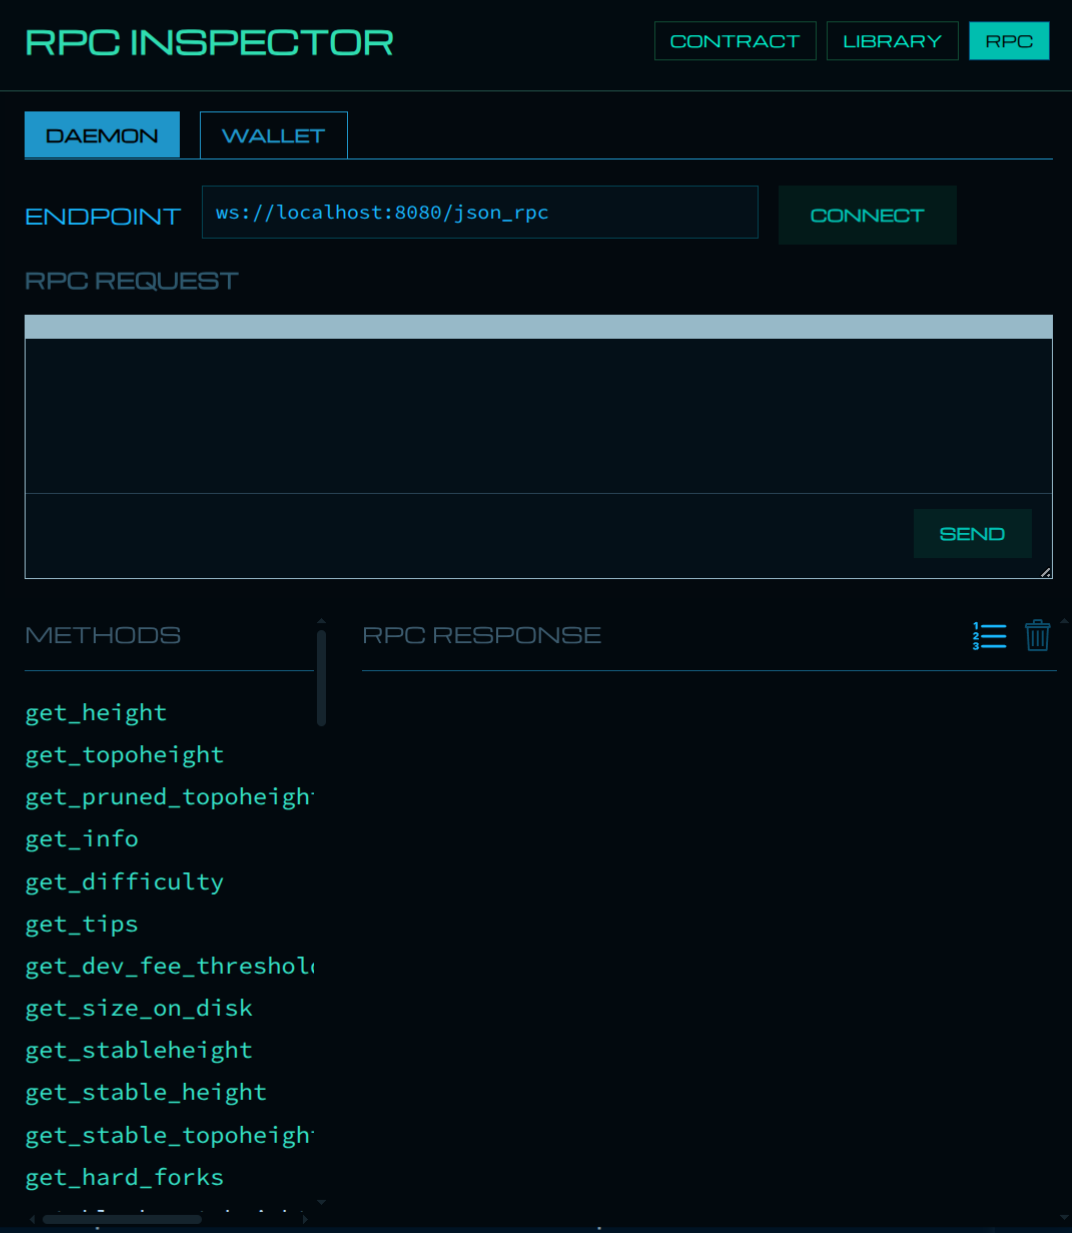
For example, clicking get_info in the DAEMON tab displays this in the query box:
{
    "jsonrpc": "2.0",
    "id": 1,
    "method": "get_info"
}
⚠️ RPC Wallet Tab Connection
The WALLET tab will show an error if your credentials don’t match those used when starting the RPC server. By default it connects to:
ws://username:password@localhost:8081/json_rpc
Change the username and password values and reconnect. Playground remembers your settings for future sessions.
Deploying via build_transaction
The wallet RPC command build_transaction is used to deploy contracts, invoke them, and transfer funds. The format for deploying a contract is:
{
    "jsonrpc": "2.0",
    "method": "build_transaction",
    "id": "[CHOOSE_AN_ID]",
    "params": {
        "deploy_contract": {
            "module": "[HEX_DATA_FROM_PLAYGROUND]",
            "invoke": {
                "max_gas": "[MAX_GAS]",
                "deposits": {}
            }
        },
        "broadcast": true
    }
}
Copy the hex data from the Export panel and paste it into the module field. Your completed request should look like this:
{
    "jsonrpc": "2.0",
    "method": "build_transaction",
    "id": 1,
    "params": {
        "deploy_contract": {
            "module": "0b0008046e616d650008106e756d6265725f6f6e655f736f6e67730001010008077665...",
            "invoke": {
                "max_gas": 500000,
                "deposits": {}
            }
        },
        "broadcast": true
    }
}
0.05 XEL was chosen as a maximum gas fee, which is significantly more than what is needed.
Paste the above into the Wallet RPC query window and click SEND. The response will contain the transaction hash — the unique identifier for your transaction. The hash field is located below fee and fee_limit in the response.
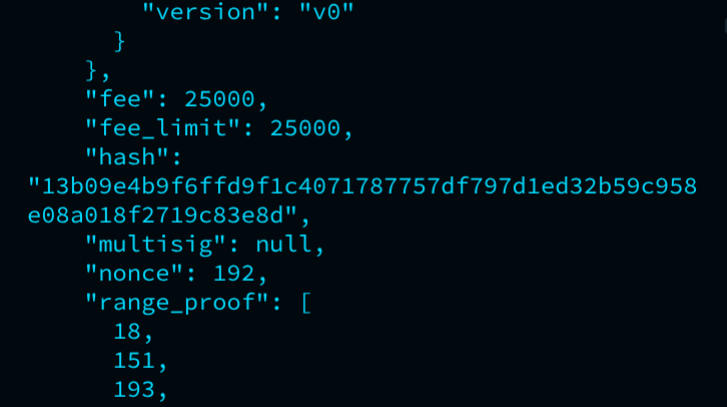
As you build dapps and interact with contracts, you’ll need the contract hash frequently. Store it in a text file for easy access.
If the miner wasn’t running, start it now to process the transaction. Once processed, your contract is on the blockchain! Congratulations!
Calling the Contract
Now that the contract is deployed to the blockchain, we can interact with it. The way we do that is to call (or invoke) the entry functions of the contract. To add an artist, call the add_artist entry function using the build_transaction method. This time, the type of build_transaction is invoke_contract.
Invoking an Entry Function
{
    "jsonrpc": "2.0",
    "method": "build_transaction",
    "id": 1,
    "params": {
        "invoke_contract": {
            "contract": "[YOUR_CONTRACT_HASH]",
            "max_gas": 500000,
            "entry_id": "[ENTRY_ID]",
            "parameters": [
                { "type": "primitive", "value": { "type": "string", "value": "[artist_name]" } },
                { "type": "primitive", "value": { "type": "u8", "value": "[num_one_songs]" } }
            ],
            "permission": "all",
            "deposits": {}
        },
        "broadcast": true
    }
}[YOUR_CONTRACT_HASH]— the hash returned when you deployed in Part 3.[ENTRY_ID]— found in the ABI tab of the Export panel. Foradd_artist, the entry_id is1.[artist_name]and[num_one_songs]— the function arguments.
A concrete example adding Drake with 13 number-one songs:
{
    "jsonrpc": "2.0",
    "method": "build_transaction",
    "id": 1,
    "params": {
        "invoke_contract": {
            "contract": "[PUT_YOUR_CONTRACT_HASH_HERE]",
            "max_gas": 500000,
            "entry_id": 1,
            "parameters": [
                { "type": "primitive", "value": { "type": "string", "value": "Drake" } },
                { "type": "primitive", "value": { "type": "u8", "value": 13 } }
            ],
            "permission": "all",
            "deposits": {}
        },
        "broadcast": true
    }
}
Insert your contract address, paste the JSON into the Wallet RPC query window, click SEND, then run the miner to process the transaction. Add a few more artists using the same method — you can add them all first (you’ll see the transaction count increment in the mempool) then run the miner to process them all at once.
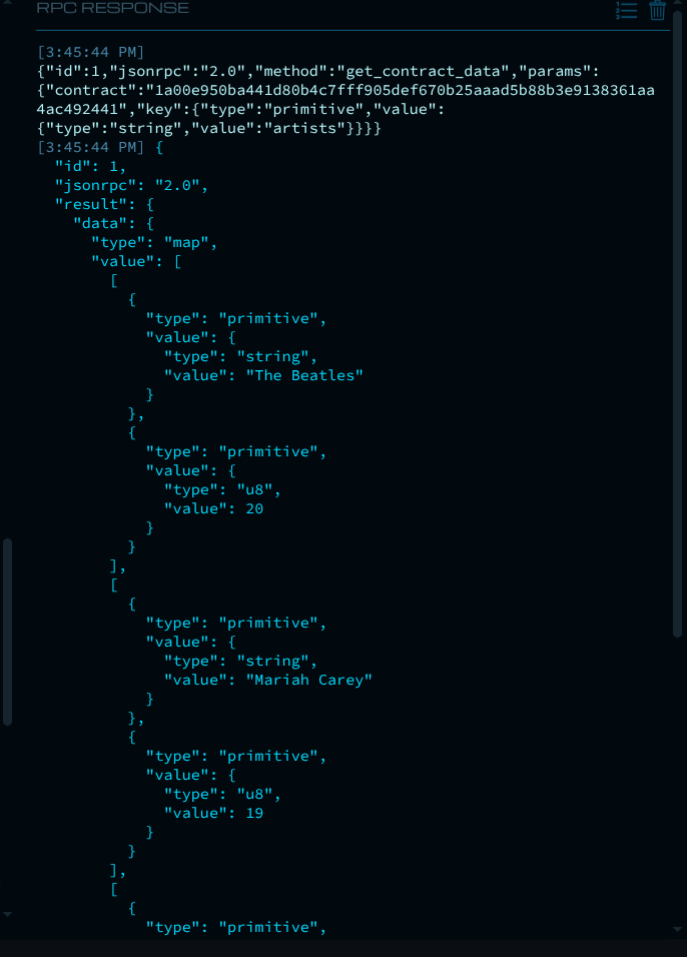
Reading Contract Data
To read data from the blockchain, switch to the DAEMON RPC tab and use get_contract_data:
{
    "id": 1,
    "jsonrpc": "2.0",
    "method": "get_contract_data",
    "params": {
        "contract": "[YOUR_CONTRACT_HASH]",
        "key": { "type": "primitive", "value": { "type": "string", "value": "artists" } }
    }
}
Fill in your contract hash and send. You should see the artists map returned in the response.
📝 Exercise
Calling the remove_artist entry function is left as an exercise. Use the same invoke_contract pattern as above, with entry_id: 2 and just the name parameter.
Congratulations!
You’ve made it to the end of this tutorial. You now know how to create and deploy a simple smart contract on the Xelis blockchain, and how to call it using the RPC Inspector. The next step is creating a more substantial contract, calling it directly via RPC, or building dapps for your users to interact with it.
We hope you’ll become an active developer in this growing and exciting ecosystem!
For questions or suggestions, please visit the Xelis Discord channel .